• Home
  • About
    • Contact
    • Privacy Policy
  • Motherhood
  • Life
    • In the News
    • Fashion & Beauty
  • Food & Wine
    • Recipes
  • Arts & Crafts
    • DIY
    • Printables
  • Entertainment
    • Television
    • Movies
    • Music
    • Atlanta-Area Attractions
  • Mental Health
    • PPD/PPA Resources

Caffeine and Cabernet

Life from 9 to wine

The Shoenicorns are jealous

July 31, 2011

So, there’s this party that happens at BlogHer called Sparklecorn. Guess what your accessories should be when attending Sparklecorn.

Sparkly.

I knew I wanted sparkly shoes after seeing Alena’s, but I didn’t want to spend a fortune on shoes that I can’t, realistically, wear any other time.

So, a shoe-hunt of another sort began. I needed a shoe to use as a skeleton and I didn’t want to spend a lot on a shoe I might screw up.

My rules: under $10 for the shoe, under $15 for the entire project.

Um, y’all, this might be the most awesome DIY I’ve done in a while.

Oooh. Aaah.

I’m going to bombard you with (mostly okay) pictures so that you can sparkle up some shoes in your life, too.

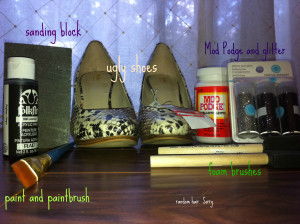
What you’ll need:

Supplies for some DIY fun!

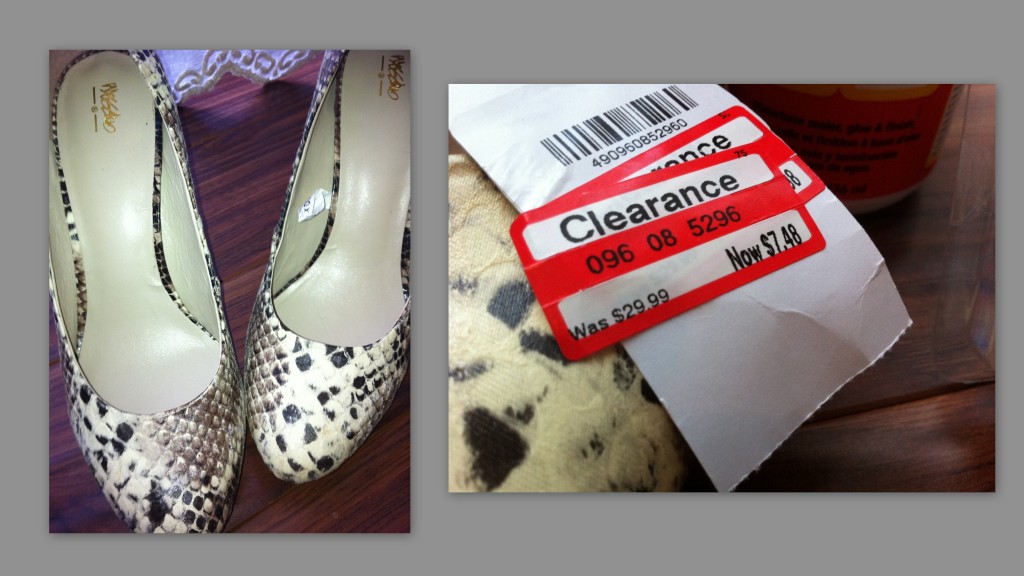
The shoes I bought were totally ugly. And totally cheap. Which made them perfect for this little venture of mine.

Just say no to really bad faux snake skin. Say yes to clearance, though.

These shoes? So not my style as they are. That price? SO my style. I stumbled upon these in my never-ending search for the Shoenicorns and, while I originally wanted peep-toes, I couldn’t pass these up. In the long run, I think closed toe will be better because I won’t get blisters on the sides of my toes from these.

Now, let’s get to it, shall we?

First? You have to prep the shoes.
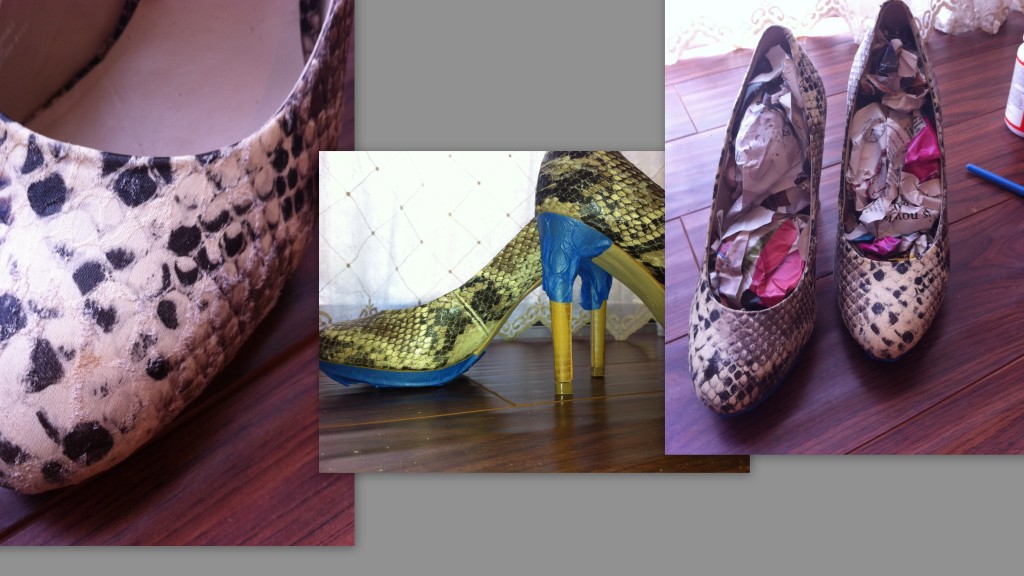
Scuff. Tape. Stuff.

Using your sanding block, scuff the shoes. This will take the shine off of them and give the Mod Podge something to hold on to as you apply it. I also scuffed the heel and platform area because I planned to paint them. If you need to paint yours, scuff those areas, too.

Then use painters tape (or regular masking tape) to tape off the heel and platform area, unless you plan to super-glitter those parts, too. I do think that it will look better to Mod Podge the two parts separately so you get a definite separation between the two areas, but it’s really your preference.

Finally, stuff the inside of the shoe with a crumpled magazine or newspaper to protect the inside from wayward globs of glitter Mod Podge.

**A note about this–As you go around the edge of the shoe, you WILL get Mod Podge on the paper. Using the handle of your foam brush, periodically push the paper away from the inside of the shoe to avoid having the Mod Podge adhere the two surfaces to each other.**

Now, you’re ready for the fun part. Glitter.

Glitter hands, glitter hands...

I read in a tutorial on Pinterest that fine glitter works better, but any glitter will work depending on the look you’re going for. I wanted something that looked more smooth, so I went with fine glitter by Martha Stewart. One package of three tubes was regularly $6. I had a coupon for 40% off, which brought the cost of my glitter to $3.60.

My glitter pack contained Onyx, Hematite, and Platinum. I used about half the tube of Platinum and less than 1/4 of each tube of Hematite and Onyx. No matter what color you want your shoes to end up, mix your glitter until you get the color-balance you’re looking for.

To get a little (more) shine on the finished product, I used Gloss Mod Podge. I’ll tell you why I’m really glad I bought this version later. I wish I could tell you how much Mod Podge I mixed into this glitter, but I really don’t know. If I had to hazard a guess, I’d say it was no more than 1/4 cup. And that was plenty for four coats on two shoes. I mixed it in a Ziploc bowl and put the lid on it between coats to keep it from drying out.
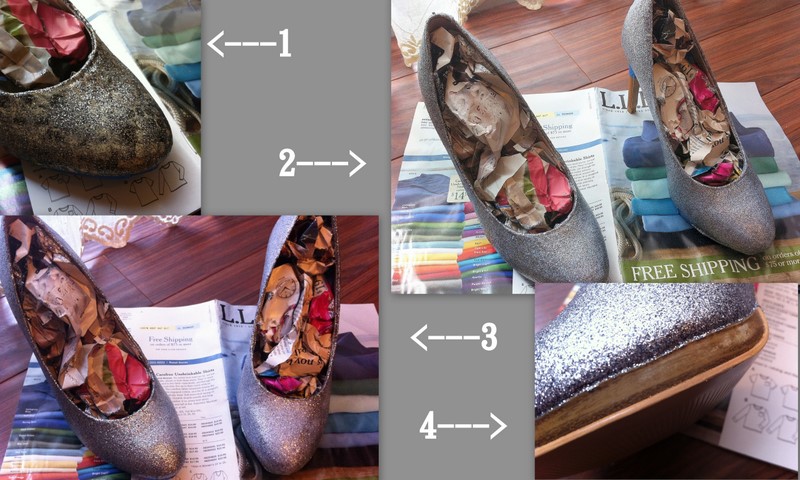
Time lapse photography.

I applied four coats of glitter Mod Podge, waiting 15-20 minutes in between each coat. As you can tell from the photos, it starts off white and dries clear. I really advise using a small foam brush for this project because the pointed tip allows you to be really precise with your application. I was able to get right next to the tape without getting (too much) of the mixture on the tape itself.

Removing the tape was something tricky in some places. When Mod Podge isn’t totally dry, it will get rubbery. Places where the Mod Podge overlapped onto the tape pulled up a little bit. But! Never fear–you just pull the rubbery glue off the tape and press it back into place on the shoe to let it finish drying.

Now, as you can see here, I started with a nude-based shoe. But nude and silver don’t exactly match on this particular shoe. So? Craft paint.
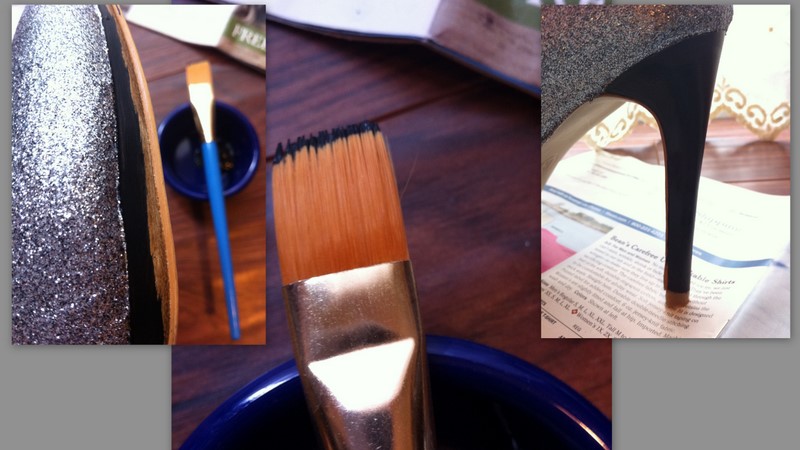
Painting. Fun times.

Those of you who’ve been around here a while might remember that I painted Joshua a onesie every month on his month-day. I have all of that paint and those paint brushes hanging around begging to be used. This provided the perfect opportunity for me to pull them out and put them to work so they can earn their space on my craft table.

This brush is really, really thin, which, again, was necessary for getting into the tiny places on these shoes. When I started, I intended to leave the sole and the edge of the sole nude because I just didn’t want to paint them. But that looked weird, so I slapped a coat of paint on them to make the whole bottom black. I toyed with the idea of painting the sole red or blue but decided to just save time and go with black. I’m glad I did.

And here’s why I’m glad I bought the Gloss Mod Podge.

The black paint is very flat. Very. After two coats, the heel of the shoe just looked really bland. But, I had all this glitter on hand, so why not, right?

I mixed up a small batch of mostly Onyx and Hematite glitter and added a little Mod Podge and got back to work on the heel and platform. I wanted to add just a little bit of sparkle there.
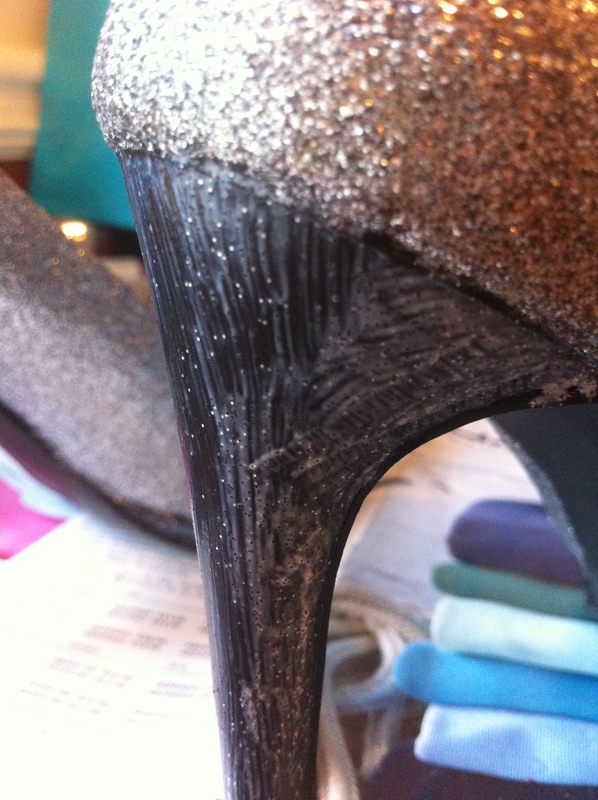
Almost done!

This is the second application to the heel. I wanted it to be known that the heel was black, but still give just a little shimmer. Two coats was plenty.

See?
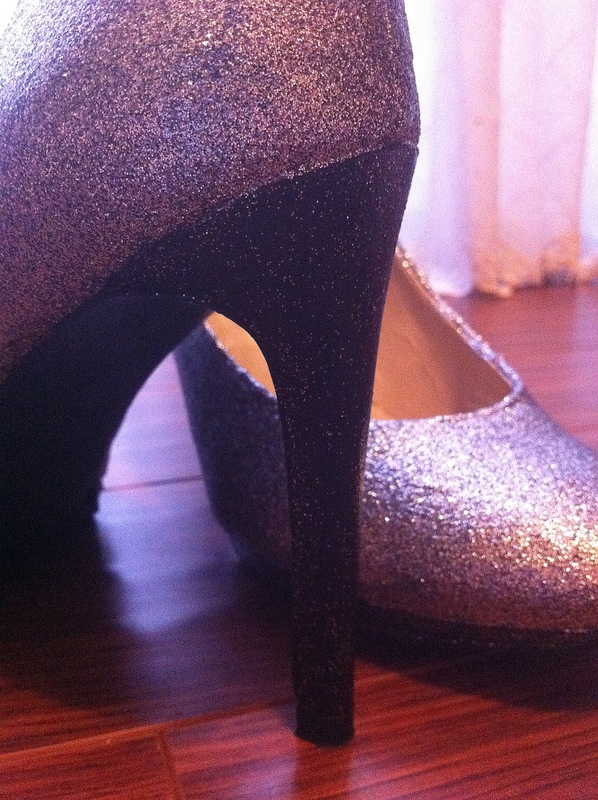
Perfect!

I’m so pumped about these pumps, y’all! They WILL kill me. I know that. But? I’m really excited to wear them. So excited I might just wear them to pack. You know, to break them in.

Cost breakdown:

Shoes: $8
Glitter: $3.60
Mod Podge: $4
Foam brushes: $.39/each (I bought 2)

So? Slightly over my budget of $15, but WAY under the closest option I could find of $20. And I wasn’t really thrilled with that other option.

These shoes? Excite me!
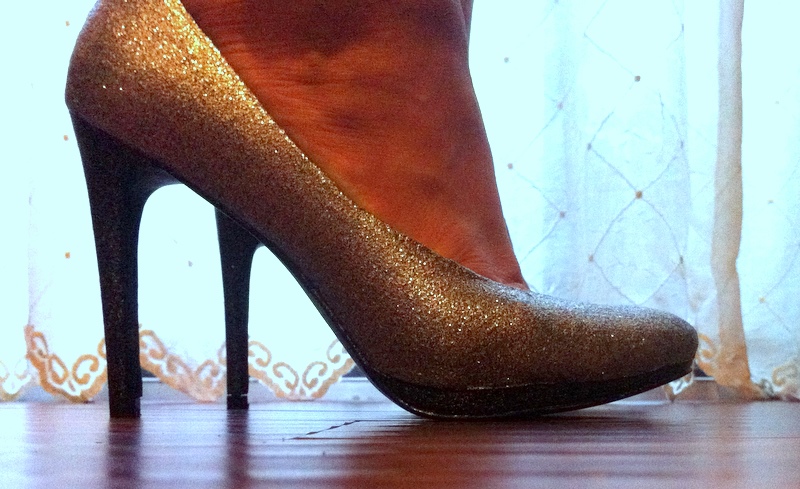
HOORAY!

Leave a Comment CATEGORIES: DIY

SHARE THIS POST:
« Perception
Back to school »

RELATED POSTS

  • Super Mario Super Birthday PartySuper Mario Super Birthday Party
  • Everyday Hair: The Tucked BunEveryday Hair: The Tucked Bun
  • This is an image of a custom Valentine featuring a tic tac toe board, a small package of Skittles, and a pencil.A Tic Tac Totally Awesome Valentine
  • Chip Chip Hooray! A Custom Pringles Label Valentine!

Comments

  1. Erin says

    July 31, 2011 at 12:52 pm

    Yes! I need to make Ruby Slippers soon for a play and this is EXACTLY the tutorial I needed! Thanks, Miranda!

    Reply
    • Miranda says

      July 31, 2011 at 2:55 pm

      You’re welcome!

      Reply
  2. TheNextMartha says

    July 31, 2011 at 1:07 pm

    LOVE!!!!!!!! That is so cool

    Reply
    • Miranda says

      July 31, 2011 at 2:56 pm

      Thanks!

      Reply
  3. mama says

    July 31, 2011 at 2:40 pm

    My legacy!! You definately have my genes! Love the shoes, and you know we can accomplish anything we set our minds to.

    Reply
    • Miranda says

      July 31, 2011 at 2:56 pm

      I do have your genes. It’s true. And? We so can!

      Reply
      • Misty says

        July 31, 2011 at 3:44 pm

        I sooo thought of your mom while ready this! ha.ha. Such a crafty duo you two are!

        Reply
        • Miranda says

          July 31, 2011 at 7:41 pm

          She and I are such a pair.

          Reply
  4. Rebecca says

    July 31, 2011 at 3:10 pm

    Now I’m wishing I had more time to DIY some sparkly shoes for myself before BlogHer! Nicely done šŸ™‚

    Reply
    • Miranda says

      July 31, 2011 at 7:42 pm

      Start to finish only took me about 2.5 hours! It’s a really quick project! The hardest part was finding the right shoes, but if you have a pair in your closet you can use? Boom!

      Reply
  5. Bitchin' Amy says

    July 31, 2011 at 4:26 pm

    Holy gawd, those are awesome! Good for you, Miss DIY!!

    Reply
    • Miranda says

      July 31, 2011 at 7:52 pm

      They are maybe not as awesome as your dress, but yeah, pretty awesome!

      Reply
  6. Jill @BabyRabies says

    July 31, 2011 at 4:44 pm

    I love these!!! Wow! I wish I saw this before I bought my $30 glitter shoes last weekend. I so would have done this instead. Great job and awesome tutorial. Off to pin it šŸ™‚

    Reply
    • Miranda says

      July 31, 2011 at 7:53 pm

      It was a REALLY quick DIY, Jill. Maybe 2.5 hours. You could always take your glitter shoes back and DIY a pair!

      Reply
  7. MamaRobinJ says

    July 31, 2011 at 4:54 pm

    Is it totally lame that one of my first thoughts was, “Holy crap those are high heels!”?

    Very cool sparkly shoes. You are way craftier than I!

    Reply
    • Miranda says

      July 31, 2011 at 7:55 pm

      No, not lame! They are WAY higher than my usual. Way. I will either break my neck or kill my feet in these, but by gosh, I’m going to look awesome for the 5 minutes I manage to keep them on my feet!

      Reply
  8. moosh in indy. says

    July 31, 2011 at 5:18 pm

    Not going to lie, as amazing as these are I was hoping they would have had horns. Im totally impressedĀ”

    Reply
    • Miranda says

      July 31, 2011 at 7:55 pm

      Maybe I should’ve added halos so they will be inclined to be nicer to me while I wear them.

      Reply
  9. Nichole says

    July 31, 2011 at 5:21 pm

    You keep giving me more reasons to love you.
    So awesome.

    Reply
    • Miranda says

      July 31, 2011 at 7:56 pm

      Aw, shucks. šŸ™‚

      Reply
  10. Alison@Mama Wants This says

    July 31, 2011 at 6:10 pm

    They are fabulous!!!

    Reply
    • Miranda says

      July 31, 2011 at 7:56 pm

      Thank you!

      Reply
  11. angela says

    July 31, 2011 at 9:13 pm

    Yay! I love those! I do not have a sparkly party to go to, or I would make shoes like that šŸ™ Maybe they will be a fall project for a pair of Abbey’s shoes.

    Reply
    • Miranda says

      August 1, 2011 at 8:13 am

      I would REALLY love to get a pair of super cheap flats and do this to a pair of them to add a little sparkle to my every day.

      Reply
  12. Cole says

    July 31, 2011 at 9:57 pm

    Gorgeous! I see sparkly shoes in Mommy’s future…

    Reply
    • Miranda says

      August 1, 2011 at 8:13 am

      Every girl needs a pair of diamonds, pearl studs, and sparkly shoes.

      Reply
  13. Suz @ Suz's Treats says

    July 31, 2011 at 11:07 pm

    I love these so much! They will be worth the pain!
    Kinda wish I’d known how easy it would be to do this then I’d probably tried to make gold glitter ones!

    Reply
    • Miranda says

      August 1, 2011 at 8:14 am

      This is a SUPER FAST project, Suz! Super fast! I think it was 2.5 hours start to finish!

      Reply
  14. Karen Hartzell says

    August 1, 2011 at 10:48 am

    That is really awesome! I def need to try this! Would love to try it with a pair I already own (bought for a past event) and NEVER wear!

    Sparkle on sister!

    Reply
  15. Rach (DonutsMama) says

    August 1, 2011 at 2:35 pm

    I am beyond impressed!

    Reply
  16. jessw says

    August 5, 2011 at 9:50 pm

    Whoa. Those shoes are aweeeesome. I saw some glitter shoes at the store today and thought of all yall at Blogher. Have fun!

    Reply
  17. Geekgal says

    July 11, 2012 at 9:42 am

    So- I totally can’t wait to see these at BlogHer. And I have a pair that I may need to do for myself. You may have created a monster!!!!!!!!!!!!!

    Reply
  18. steph says

    July 19, 2012 at 12:04 am

    awesome tutorial. i am an art teacher and i am always pulling out the glitter glue because.. Glitter makes everything better!

    Reply

Leave a Reply Cancel reply

Your email address will not be published. Required fields are marked *

This site uses Akismet to reduce spam. Learn how your comment data is processed.

Spilling words onto the Internet since 2003. Read more about me here.

Let’s Connect

Looking for Something?

caffeineandcab

Professional binge watcher.
Online community manager.
Lover of #coffee, #wine, and words.
Living the suburban #Atlanta working #momlife.

Miranda Wicker
Way to call me out @costarastrology. Ouch! Right i Way to call me out @costarastrology. Ouch! Right in my #pisces feels with this one. 
.
.
.
.
#costarastrology #astrologymemes #astrology #astrologyposts #piscesseason #pisceswomen #proudpisces #piscessun #piscessunscorpiomoon
We made soaps! Pink and blue princess gems and s We made soaps! 

Pink and blue princess gems and sparkly galaxies and bars with our favorite Magic Kingdom-inspired scents. 

Emma is my Crafty Crafter partner in crime who has never seen a project she hasn’t wanted to try. (Between her Nana and me, she comes by it honest.) I ordered the supplies for pickup from our local @michaelsstores for about $20 and ta-da! 

Check out my Story for a longer look at the fun. 
.
.
.
.
.
#crafting #crafternoon #craftymom #craftykids #momsofgirls #girlmom #craftersofinstagram #crafty #craftykid #craftwithkids #handmadesoap
The electric socks are duds. So blankets and @gler The electric socks are duds. So blankets and @glerups_usa are my book companions. This week’s read is The Southern Book Club’s Guide to Slaying Vampires. Every man in it is a misogynistic piece of 1980s trickle-down economics trash, but I’m eager to see if Patricia will emerge victorious.

#amreading #bookstagram #bookobsessed #mustlovebooks #readmorebooks #readallthebooks #vampirebooks #southernlit #kindleoasis #whatareyoureading
Happy Valentine’s Day to me. Because nothing say Happy Valentine’s Day to me. Because nothing says ā€œI love youā€ like ā€œstop touching me with your freezing cold feet.ā€ 

(Marry the person who understands how much you despise being cold/wet/cranky/whatever and problem solves for those things. That is true love.)

#valentinesday #truelove #thisislove #happyvalentinesday #heatedsocks #ihatebeingcold #thisismarriage #marriedlife
An auspicious horoscope for me today, eh @alexandr An auspicious horoscope for me today, eh @alexandrawrote & @the818?

#pisces #pisceslife #followyourjoy #costarastrology @costarastrology #isitpiscesseasonyet
Dear Gen Z or Tik Tok-ers or whoever says I’m su Dear Gen Z or Tik Tok-ers or whoever says I’m supposed to give up my skinny jeans and embrace the center part:

Get back to me after you experience postpartum hair loss that never grows back quite right and decide to re-embrace your hair’s natural texture and wave—which does not nicely lend itself to a butt cut (which I already attempted and survived in the 90s TYVM)—in the middle of a global pandemic because doing your hair every day is for the birds.

Signed,

A (very exhausted) BTDT Xennial 

#thisisajoke #dontyellatme #wearwhateveryouwant #itsjusthair #centerpart #sidepart #skinnyjeans #yogapants #skincare #nomakeup #pandemichairdontcare #eldermillennial #xennial #motherhood
Load More... Follow on Instagram
THEME BY ECLAIR DESIGNS