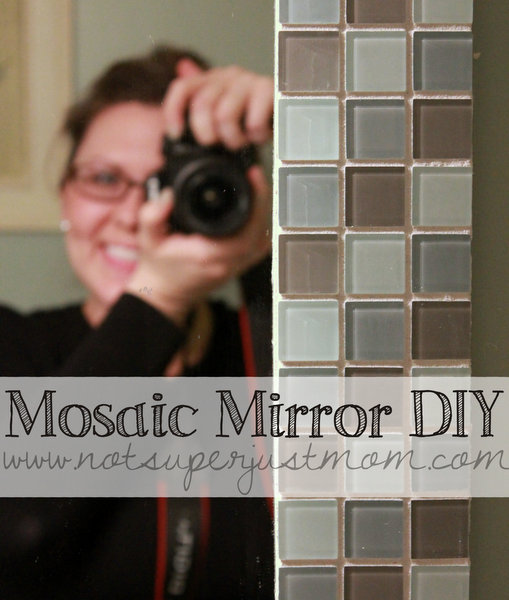
I consider myself pretty handy when it comes to home improvement projects or crafty ventures. I get it from my Mama. There’s absolutely nothing the woman won’t figure out how to do.
So when I was invited to attend a class and learn how to to mosaic tile a mirror, I jumped at the opportunity to expand my DIY skill set.
Note: While the photos in this post are watermarked for another site (my old one) the content was updated in September 2023. This post also contains affiliate links.
Everything I needed to know to complete this project I learned in under an hour at a Home Depot’s Do-It-Herself workshop. Under an hour! That’s how easy this project is.
In total, the project took about 6 to 8 hours of work time over the span of a few days.
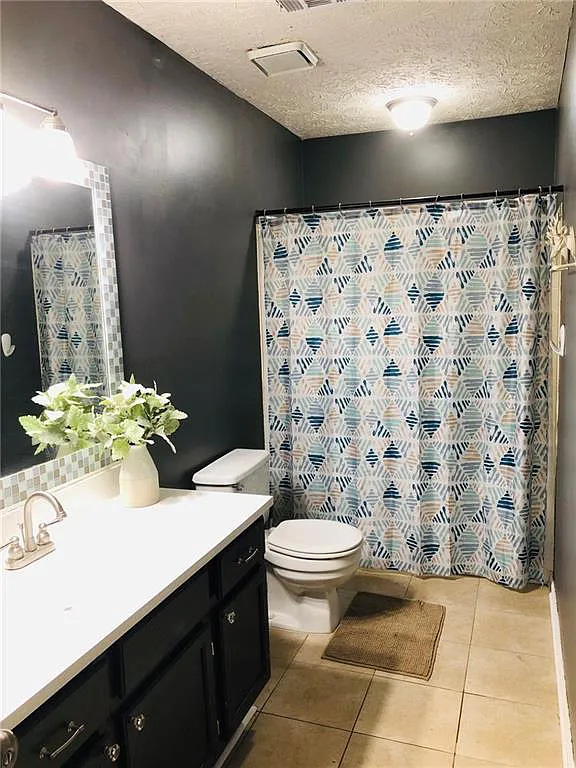
Because of the housing market crash in 2008, we felt stuck in that house. There were parts of it that I definitely didn’t like. Lots and lots of parts of it. Like the front bathroom. But it was our home, so my goal was to make it a place we loved being, which means lots and lots of home improvement.
After attending the DIH workshop, I grew a wild DIY hair and began talking Dan’s ears off about renovating the front bathroom. Starting with applying my newly developed skills and adding mosaic tile to the front bathroom mirror. Thankfully, he loves me despite my penchant for 11th hour DIY planning.
Step One: Gather Your Supplies

For this project, you’ll need mosaic tiles of your choice, adhesive tile mat, pre-mixed adhesive and grout, a sponge or two, a 150-grit sanding block, and some clean cloths. All of this cost me about $60 at my local home project store, but you can order from Amazon.
You will also need scissors or a box cutter, painter’s tape, a razor/scraper, access to water, either in a bucket or your bathroom sink, and patience.
Step Two: Cut Your Tiles
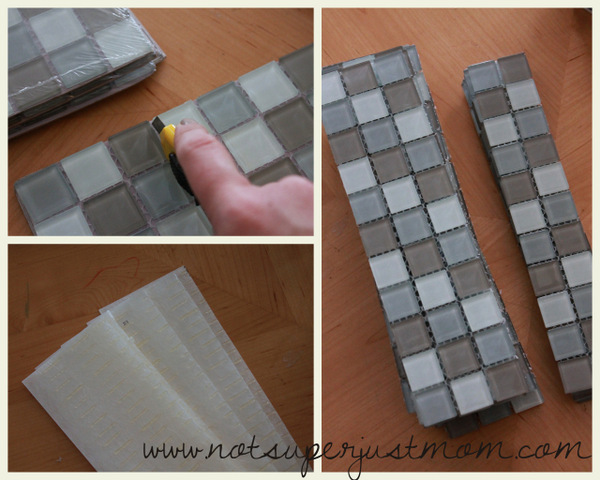
My bathroom mirror was 40 inches x 47 inches. Each mosaic tile sheet measured 12 x 12 inches. I used five sheets of tiles with extra tiles to spare. It’s always better to overestimate how many tile sheets you’ll need in case you encounter difficulty. You can always return any unopened tiles after the project is finished.
Using a box knife, I cut each of my tile sheets to the border size I wanted, which in my case was 3 inches. I extended the visual size of the mirror to 48 inches to match the length of the countertop.
SimpleMat comes in 9 x 18-inch sheets, so I cut several sheets into strips of just under 3 inches wide. I also cut two sheets into strops just under 2 inches wide to accommodate the edges I was extending.
Step Three: Prep Your Mirror
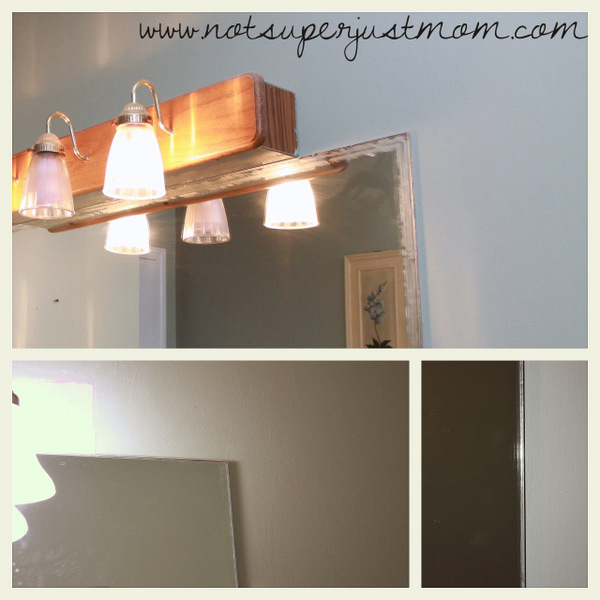
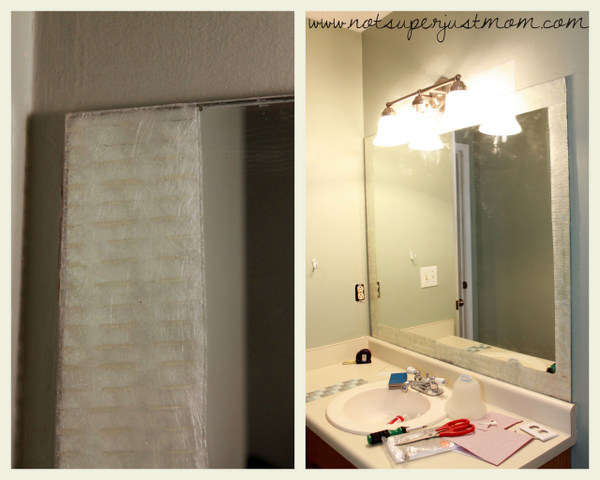
Make sure your mirror surface is clean and dry. The previous homeowners had glued a tiny frame to the surface of our mirror. Because it’s in a bathroom, the steam from showers caused the glue to unglue and the frame fell off.
I’m ashamed to say how long we lived with that ugly, glue-gooed mirror surface. While I kid wrangled, Dan scraped the glue off the mirror using a razor blade/scraper tool.
(You’ll also notice I changed the light fixture. Buh-bye ugliest box light I’ve ever seen in my life!)
Step Four: Sand Your Mirror’s Edge
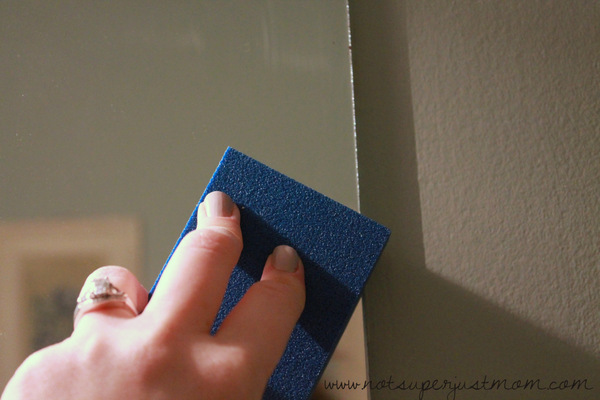
Using your sanding block or sandpaper, rough up the outer edge of your mirror, just a little, being careful not to go further into the mirror’s center than you intend your frame to extend.
You just want to scuff the surface, which you can see in the upper portion of the above picture. (It’s really, REALLY hard to get a good shot of the scuff marks! Just a little. Promise!)
Step Five: Apply the Adhesive Tile Mat
I used a product called SimpleMat, but there are many, many similar products on the market now. Bonus, you can use adhesive tile matting on wall projects, too! Kitchen backsplash? Perfect! Adhesive tile matting eliminates the need for concrete or wooden backer board and for applying a layer of adhesive and raking it before applying the tile. Using adhesive tile mat easily cut this project time in half.
Cut your adhesive tile mat slightly smaller than the width of your tile strips. Peel the backing and apply the sticky side to the mirror’s clean, dry surface. Most adhesive strips are covered with a clear film that you’ll peel away before applying the tile.
Step Six: Apply Your Tile
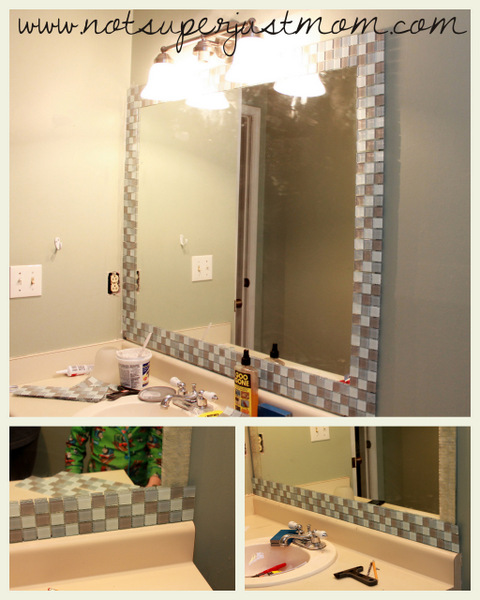
Peel the clear film from the adhesive tile mat and apply your mosaic tile strips, working in small sections until you’ve covered the perimeter of your mirror.
I thought I would have 1/2-inch overhang on both sides of my mirror and ended up with almost a full 1 inch on each side which was fine because it actually looked better this way. To make sure the tiles that weren’t on the mirror would be sturdy, I used the pre-mixed tile adhesive and grout (hooray combination product!) to build a base behind the tile on either side of the mirror, as seen below.
Short on time? Save this post for later.
(It's like a bookmark, but...not.)
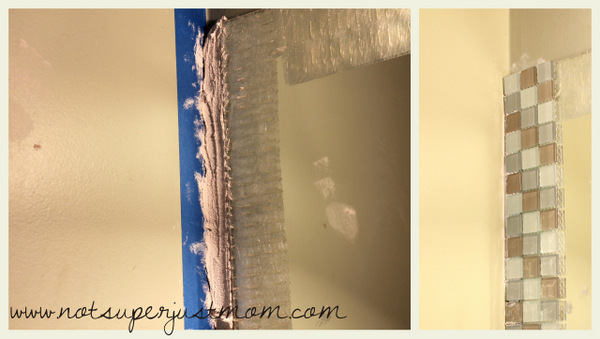
Once the tile was in place, I used a plastic knife to scrape away excess grout that squished (technical term) out from behind the tile. Then I removed the painter’s tape and let the grout set while I watched tv.
Pro tip: It is strongly advised (by me, based on my own errors) that you lay out your tiles on your mirror before adhering them to double and triple check your measurements. I did not do this and ended up having to peel off part of the tiles, scrape off one entire side of tile mat, and then redo my work. Trust me on this. Lay them out before sticking them to the adhesive.
Grab a partner and hold your tiles up and mark on your mirror where the tile strips begin and end and mark which tile strip went where. This will also allow you to figure out if you’ve bought enough tile and arrange your strips to get a pattern you like, if you’re concerned with that. I didn’t want same-colored tiles touching across strips.
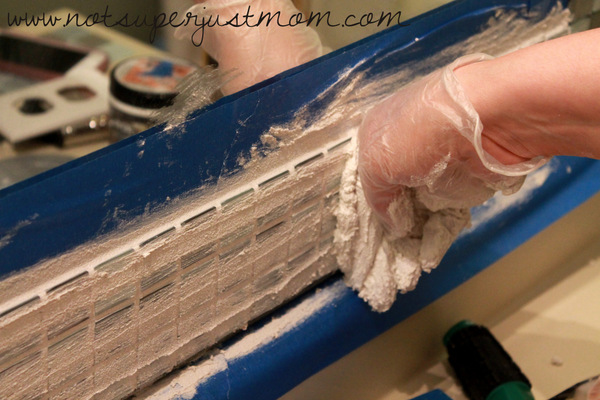
Step Seven: Apply the Grout
Applying grout is actually a multi-step process and you’ll have about 30 minutes per section before the grout begins to set and gets harder to wipe off. However, each section of the mirror took me about 15 minutes start to finish, for a total of 1 hour of grouting. It was the fastest and easiest part of the whole project.
Most people would use a tool called a grout float to do this step, but I just grabbed a latex glove and used my hand. I could feel and see what I was doing instead of just being able to see. Tape off your wall and mirror and then begin.
First, you put the grout on the tile.
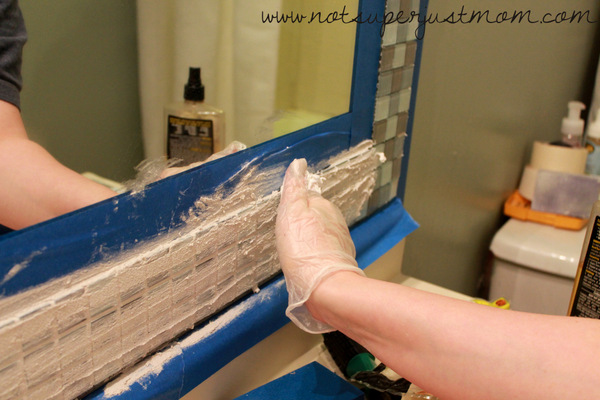
Next, you scrape off the excess:
Then, you wash down the tiles and grout until no grout remains on the tile, being sure to rinse your sponge frequently and change your water often.
This is where being in the bathroom came in handy. I just used the sink. (A commenter suggested this is not a great idea. Use a bucket with water you can dump and replace instead!)
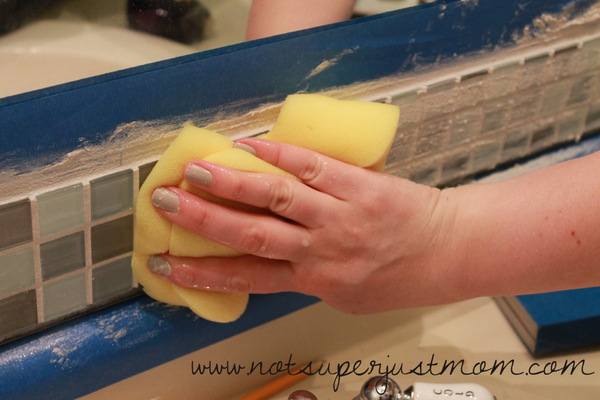
You really want to make sure that you don’t leave grout film (which you can see on the tiles in the bottom left of the above picture) on the tiles. If you do, you’ll need to polish the tiles to get it off. So wipe with the sponge and rinse rinse rinse.
Then gently wipe with a clean cloth, microfiber works well, but I used a jersey cloth and paper towels and they both worked well, too.
Once your mirror is grouted, peel off your tape and leave the grout to dry. I went to bed right after finishing the grouting on Sunday night and everything was dry by Monday morning.
Step Eight: Admire your DIY Handiwork
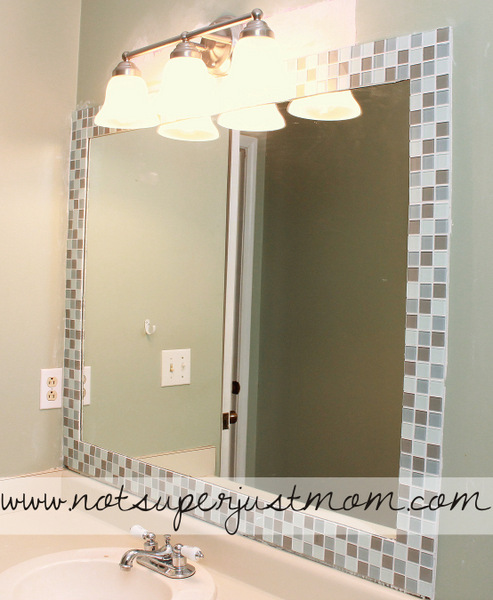
You did it! You did it yourself! It looks amazing and you did that! That’s pretty awesome, right?
So now you can stare at the mirror and find reasons to go into your lesser-used bathroom to look at it. And maybe take 100 or so photos of your handiwork.
The actual final step in this process is sealing the grout. That will protect the grout from cracks and water damage. I gave the grout a few days to cure before applying the sealant, but I don’t know that several days are necessary.
After adding mosaic tile to the mirror, I tackled painting the ugly countertop and cabinet in that bathroom. By the time this renovation was done, the employees at my local Home Depot store probably knew me by name.
September 2023 update!
This house has been sold twice since we sold it, and the mirror is still going strong, over ten years later.
I definitely swiped this photo from the most recent real estate listing. The bathroom wall color and floor tile has been changed, and it looks like the cabinet and countertop may have been replaced, too.
But that mosaic tile mirror?
That’s all me.
If you do this tutorial, I hope you’ll let me know how it turned out for you! I’d love to see your finished projects!
It’s not letting me include the link to my page for some reason. If you should like to see pictures I’d be happy to email them to you.
hey there,
Yes, I would love to see your project, as I’m planning to redo my bathroom. Just got my tiles! I’m super excited, but scared a bit, too LOL
LOVE IT! and will be doing it the same with my ugly bathroom 🙂 thank you for the awesome idea!
I don’t have any comment yet.
I just would like to ask a question.
My bathoom 4 beveled mirror panels that placed on the wall above my vanity have black spaces between the beveled edges from water penetration. I want narrow glass mosaic strips (about 0.5″ wide) to
attach over beveled edges connections to cover damaged spaces ? What material I can use : grout, cement or glue?
This is for Emil who posted March 23, 2015 at 7:23 pm. I have the same problem and have been looking at the frames, but saw this post and like the idea. Did you have any luck – especially with the beveled edge. Thanks.
Thank you! The basement bathroom mirror had a crack all the way up the middle. I used this tile process to cover it, and now just some fun art deco and NO CRACK! 🙂
hi.. i definitely going to do this makeover to my bathroom mirror over the christmas holiday’s. no school- no students…. just me and and some tools.
i’m interested in seeing what your the makeover to the countertop and the rest of your bath turned out. may i see the pics please?
thank you.
Thanks for your detailed instructions. You inspired me to tile a mirror for our cloakroom. I managed to buy a mirror with a chipped edge very cheaply. Fortunately it had a bracket on the back so could be hung from behind. Because of the extra weight of the tiles we reinforced the attached bracket with superglue and so far the mirror has stayed on the wall. Thanks for your helpful post!
Hi
Want to use this idea for my bathroom mirror vanity. It’s a 3 door beveled old one can use decor on the bevel that’s stained. Wondering how the doors will open with the tiles around. I want to put the tiles around all the doors
I found this on Pinterest and happened to have the same tile just waiting for a project! The three sheets I had bought because I loved the colors were just the right amount for a free mirror that I picked up! Could not have gone together better. I work at the other “blue” store and was hired for the sole reason that they knew my name because I was in there too much lol. This made me happy!
Getting ready to grout right now! Question: what did you do to tidy up the edges of the tile? I’ve got some areas where the plastic backing has some “fringe” sticking out. Thinking about caulk because these little things aren’t easy to cut off (tried exacts knife), but that is hardly a perfect solution.
I had the same problem and we used finger nail clippers.
I followed this tutorial today in my guest bath and the results are amazing! I wish I could post a picture of how amazing it turned out. We haven’t sealed yet but I cant stop going in and looking at it!
Thank you so much for posting this! I did 2 mirrors today (one in a half bath downstairs and one in a full guest bath upstairs) and they came out BEAUTIFULLY!!! Your instructions were so clear & the SimpleMat was amazing. I want to tile everything now
Isn’t SimpleMat amazing!! I’m so glad you had a good experience!
These instructions were absolutely perfect and I cant thank you enough. We did it on our 1/2 guest bath and it came out beautifully. We are going to do the same in our master bath. Thank you again!!
Also, I love the name of your website 🙂
I’m so, so glad you had a great experience! Thanks!
I want to do some mosaic tile on a lamp I have and wonder if you have had any experience doing that?
I love your mirror but I wanted to know what did you do with the clips that hold the mirror to the wall? How do I work around those? I didn’t see any on your old mirror???
Thank you, I love the look of my mirror. Without your instructions it would have been a disaster, especially the tip to lay the tiles out first. we had to rehang the mirror so I bought low profile clips from home depot and tiled right over them, tossed out the plastic ones. It was important to trim the mesh real close to the edge of the tiles so it didn’t show or get in the way of the grout.
As a nervous virgin mosaic DIY-er, I found this really helpful advice. As an English teacher, I had a fit of stifled midnight sniggers over your sentence about watching The Walking Dead while the grout dried. Top marks for style!!
Hi Miranda – I have just finished my mirror project, following your instructions. I really enjoyed working on it and am delighted with the results. Thank you so much.
I’m so happy to hear this, Fiona! We’ve been out of that house for almost a decade, but the mirror is still there!